
Resonance System
共鸣系统
Silver Palace has no elemental reactions. Every Reactor Attribute you field builds its own meter on the enemy instead, and filling one triggers that attribute's Resonance Effect.
Silver Palace has no elemental reaction system. You do not freeze a burning enemy or overload a wet one, and there is no combo chart to memorise. What the game gives you instead is Resonance: a meter that builds on the enemy you are attacking, one gauge per Reactor Attribute your team fields, and a named payoff that fires the moment a gauge fills. Your Reactor Attribute decides which payoff you get, so picking a team is really picking which Resonance Effects you want going off in a fight.
This guide covers where the meter lives on screen, what each of the seven Resonance Effects does, which characters can actually trigger them, and the gear and kits that feed the system. For the wider picture of how the roles fit together, read the Combat Styles & Identities guide and the Combat Mastery guide.
Quick Answer
Resonance works at the individual attribute level. Deal Ignis damage to an enemy and that enemy's Ignis Resonance meter fills; fill it and Extreme Heat triggers on them. There are seven effects, one per Reactor Attribute: Extreme Heat (Ignis), Zero Degrees (Glacies), Superconductor (Fulmen), Dark Star (Gravitas), Decay (Radiatio), Disintegration (Alba), and Purification (Ferrugo).
The practical read is that staying aggressive on one attribute pays better than spreading damage thin, because a half-filled meter does nothing. Characters with the Resonance DPS Combat Style are built specifically to cash these effects in, and several pieces of gear either grant Resonance directly on hit or amplify the effect when it lands.
New in the Combat Edition Update: Resonance Effects
The official "The Science of All Things: Combat Edition" reveal describes a Resonance mechanic that works at the individual-character level. Each character builds a Resonance meter as they attack, and once it fills, a Resonance Effect triggers based on that character's Reactor attribute, significantly boosting the damage they deal. In other words, your Reactor Attribute does not just shape your kit, it also decides the payoff you get for staying aggressive.
That meter is confirmed in the Dichotomy build, and it is the whole system. Every number below comes from Dichotomy beta footage and live kit data.

A Reactor-attribute Resonance Effect firing once the meter fills, from the official Combat Edition reveal.
Where the Resonance meter appears
The meter sits in the upper part of the HUD, on the enemy nameplate directly below their health and stagger bars. It is easy to miss on a first playthrough because the icons are small and unlabelled, but they are the most important thing on that nameplate once you understand the system.
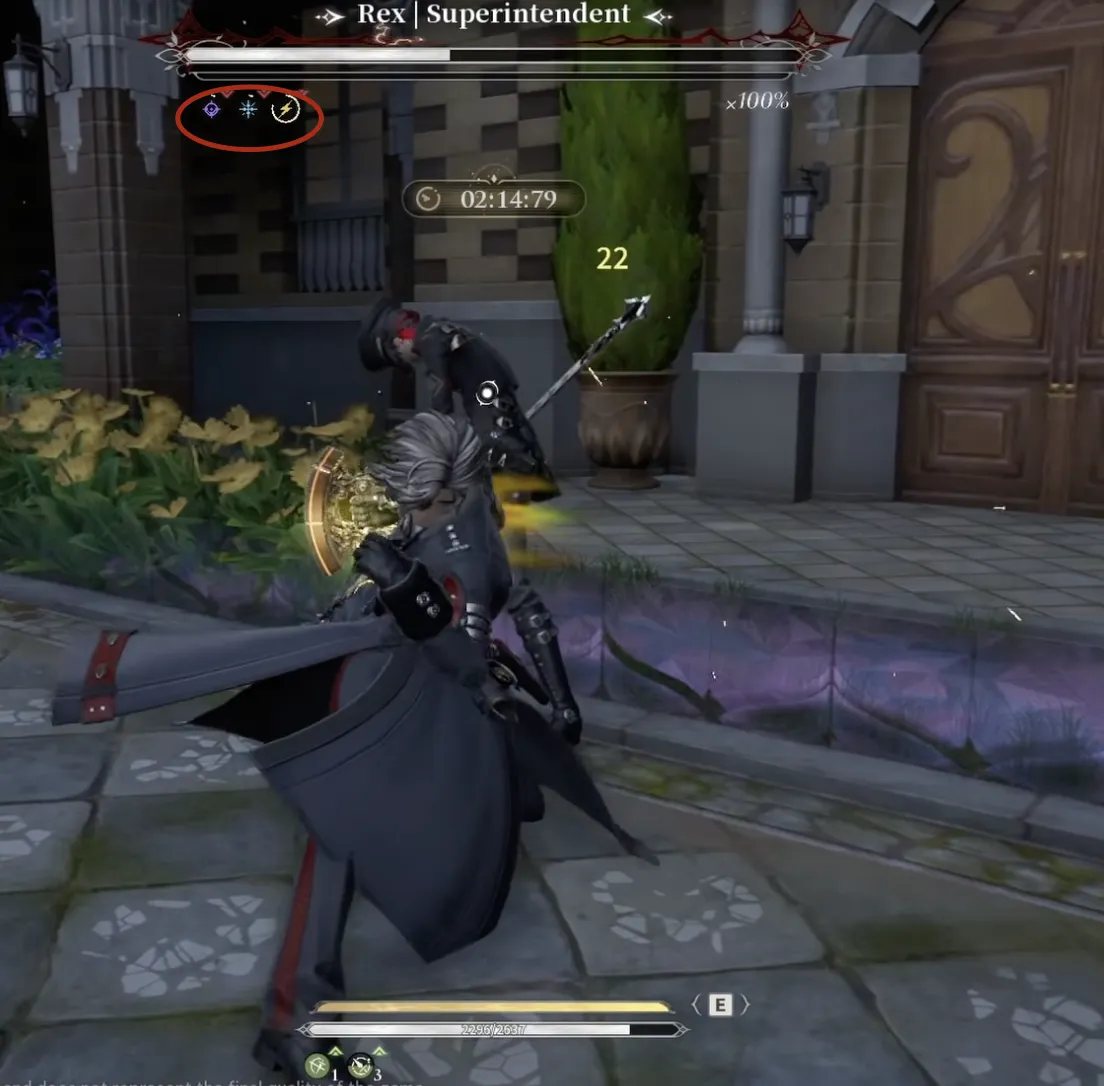
Resonance meters on the boss nameplate, one icon per attribute the team fields, with the Fulmen gauge partly filled. Official Dichotomy beta footage.
Read it like this. Each Reactor Attribute your team brings gets its own icon on that nameplate, so a team running Gravitas, Glacies and Fulmen shows three icons, as in the screenshot above. A circular gauge wraps each icon and fills clockwise as you deal that attribute's damage to that enemy. In the frame above the Fulmen gauge is roughly three quarters around while Gravitas and Glacies are still empty, because the player has been leaning on their Fulmen character.
Two consequences matter in play. Resonance is tracked per target, so the work you put into one enemy does not carry to the next one, and it is tracked per attribute, so switching between two characters of different Reactor Attributes builds two gauges at half speed instead of one gauge at full speed. Resonance is also a real number rather than a vague fill state: Rex's Psyche reads "his Fulmen Resonance increases by 100" on a skill cast, and the Attribute Catalysts in Hilbert's Hotel grant "180 Resonance on DMG" for their attribute.
All seven Resonance Effects
The Resonance Effect panel lists every effect in the game alongside a wheel of the seven Reactor Attributes arranged around a central Reactor core.
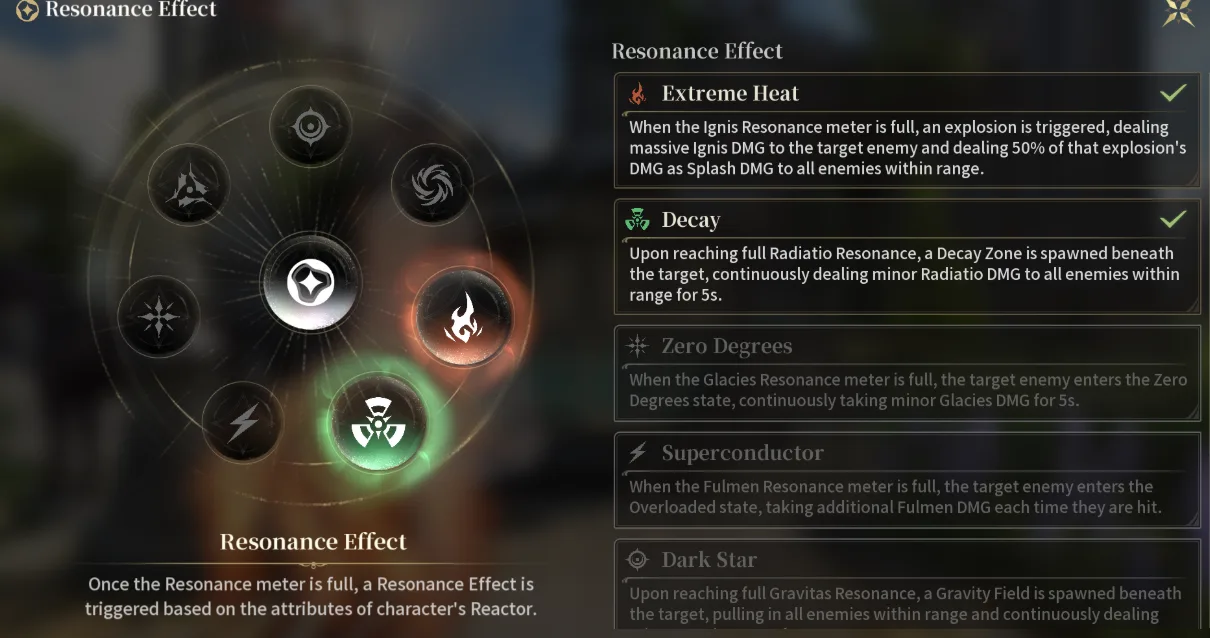
The Resonance Effect panel, with Extreme Heat and Decay checked off for the current team. Official Dichotomy beta footage.
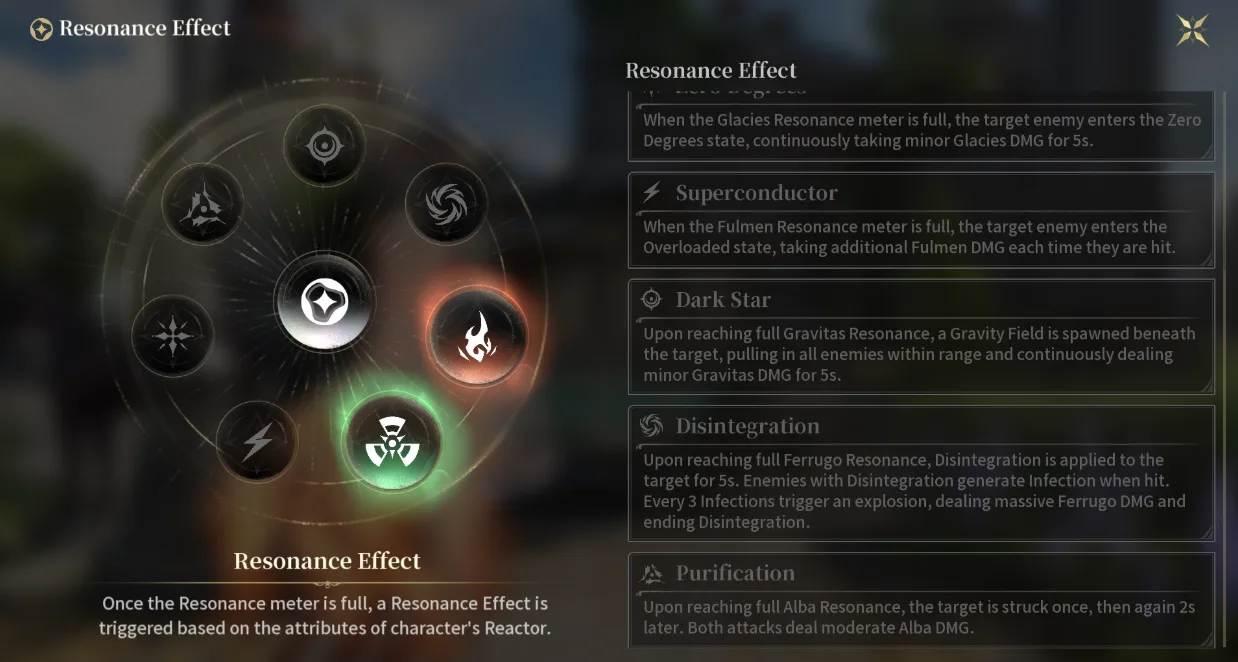
The same panel scrolled down to Disintegration and Purification, the two effects with no playable Alba or Ferrugo carrier in most teams. Official Dichotomy beta footage.
The panel doubles as a team readout. Effects your current team can trigger are printed bright with a green checkmark, and the rest are greyed out. In the screenshots above Extreme Heat and Decay are checked, and on the wheel the Ignis node glows orange and the Radiatio node glows green to match, so that team is fielding Ignis and Radiatio characters and cannot trigger the other five effects at all.
| Attribute | Effect | What it does |
|---|---|---|
 Ignis Ignis |
Extreme Heat | Triggers an explosion dealing massive Ignis DMG to the target, then deals 50% of that explosion's damage as Splash DMG to all enemies in range |
 Glacies Glacies |
Zero Degrees | The target enters the Zero Degrees state, continuously taking minor Glacies DMG for 5s |
 Fulmen Fulmen |
Superconductor | The target enters the Overloaded state, taking additional Fulmen DMG every time it is hit |
 Gravitas Gravitas |
Dark Star | Spawns a Gravity Field beneath the target that pulls in all enemies in range and continuously deals minor Gravitas DMG for 5s |
 Radiatio Radiatio |
Decay | Spawns a Decay Zone beneath the target that continuously deals minor Radiatio DMG to all enemies in range for 5s |
 Alba Alba |
Disintegration | Applies Disintegration to the target for 5s. Enemies with Disintegration generate Infection when hit, and every 3 Infections trigger an explosion dealing massive Alba DMG and ending Disintegration |
 Ferrugo Ferrugo |
Purification | Strikes the target once, then again 2s later. Both attacks deal moderate Ferrugo DMG |
Three of these are area effects worth calling out. Extreme Heat, Dark Star and Decay all reach enemies other than the one whose meter you filled, which makes Ignis, Gravitas and Radiatio the attributes that scale up in crowds. Superconductor and Zero Degrees are single-target pressure instead, and Superconductor in particular rewards a fast attacker because it pays out per hit rather than per second.
The Alba and Ferrugo label swap
The in-game text on the last two entries has the attribute names backwards. Disintegration reads "Upon reaching full Ferrugo Resonance, Disintegration is applied to the target for 5s", and Purification reads "Upon reaching full Alba Resonance, the target is struck once, then again 2s later".
The icons printed in the same rows say the opposite, and they are the ones to trust. The vortex swirl beside Disintegration is Alba's Reactor Attribute icon, and the tri-blade cluster beside Purification is Ferrugo's, both matching the official attribute art and their positions on the wheel. Disintegration is therefore the Alba effect and Purification is the Ferrugo effect, which is how this guide lists them. The mechanics also line up that way round: Ferrugo converts contaminated Silverium, so an Infection-stacking effect reading as Ferrugo makes sense right up until you check whose icon is on the row.
The swap is not isolated to that one panel. The Selenite Attribute Catalyst in Hilbert's Hotel carries it too, printing Alba where its refined tier enhances Purification. Ferrugo also has no playable character in the current roster, so Purification is the one effect on this list you cannot trigger yet.
One piece of evidence points the other way, and it is worth recording rather than burying. The game's own art files tie Alba to Purification: both Alba characters, Cynthia II and Gucia, carry an attribute portrait named CharacterPersonality_Property_Purification, and Gucia has an attribute damage node whose icon is named T_Attribute_PurificationHarm. That agrees with the in-game description text, not with the icons printed on the panel. Set against that, Alba's internal naming is inconsistent everywhere else in the game files, appearing as burst for its attribute icon and Silver for its damage type, so this is evidence rather than proof. Treat the assignment above as the working answer and the question as open until a build ships that resolves the text and the icons the same way.
Which attributes you can actually trigger
Six of the seven attributes have at least one playable carrier. That is the real constraint on team building, because an effect you have no character for is an effect you will never see.
| Attribute | Effect | Playable carriers |
|---|---|---|
| Ignis | Extreme Heat | "Cinderella", Alf, Cynthia II, Red Rose |
| Glacies | Zero Degrees | Argos, Bentham, Gratia |
| Fulmen | Superconductor | Lorin, Rex, Grimm |
| Gravitas | Dark Star | Hugin, Munin |
| Radiatio | Decay | Firtho, Captain Kaboom |
| Alba | Disintegration | Gucia |
| Ferrugo | Purification | None yet |
Ignis, Glacies and Fulmen are the attributes with enough bodies to build a committed team around, which is why those three effects show up most often in practice. Alba runs through Gucia alone, so Disintegration is a single-character plan for now. Browse the full roster on the characters page to see who fits where.
Building around Resonance Effects
The system has a role attached to it. Resonance DPS is one of the five Combat Styles, and it describes characters whose damage comes from Resonance Effects rather than from their own skill numbers. Rex and Bentham both carry it, and their kits show what that means: Rex's Psyche makes Fulmen Resonance Effects deal 2 additional instances of Fulmen DMG, and Bentham's does the same for Glacies. Bentham goes further and turns the trigger into a team buff, granting every character 15% Glacies DMG for 40s after she sets off Zero Degrees.
Gear feeds the same loop. In Hilbert's Hotel, Attribute Catalysts grant 180 Resonance of their attribute on damage and their refined tiers greatly enhance that attribute's effect, so Red Agate feeds Extreme Heat and Rime Ice feeds Zero Degrees. Three catalysts are worth planning around specifically:
- Extracted Cobalt, refined into Polarite, grants 450 Resonance of the matching attribute whenever a Resonance Effect triggers, rising to 900 when refined. That turns one trigger into most of the next meter.
- Kunzite, refined into Glowstone, has a 90% chance to trigger Dark Star on defeating an enemy, and always triggers it once refined.
- Vibrathrite raises your Amplitude Multiplier by 450% for 10s on a Resonance Effect trigger, doubling to 900% as Ultra Vibrathrite.
If you are picking one attribute to commit to, weigh the effect against the fight. Crowded rooms favour Extreme Heat, Dark Star and Decay for their area damage, while boss fights favour Superconductor because Overloaded scales with how many times you can hit a single target. The Motives database covers the other half of the gear picture, and the Combat Mastery guide covers piloting a team once you have one.
Resonance is a number, not just a bar
The meter is a quantity that kits and gear can add to directly, not only something that fills as you attack. Two effects make that explicit. Rex's Psyche Evil Eradicator reads "Whenever Rex casts Skill: Nunchucks Law, he deals an additional 100% Fulmen DMG, and his Fulmen Resonance increases by 100", and the Epiphany Killing That Which You Love consumes a stack of Pomegranate Kiss to "deal 100 Glacies Resonance to the target". The Hilbert's Hotel catalysts above are the same idea at a larger scale, granting 180 or 450 Resonance outright.
The rate itself has exactly one lever in the current build. The Lead Catalyst gives the holder's Skill a 24% Resonance Accumulation Efficiency increase, and only for 12 seconds after they trigger a Tactical Assault. There is no general accumulation stat you can gear for, so build-up speed comes from how often you land attacks of the right attribute.
What triggers off Resonance
Filling a meter is worth more than the effect it fires, because several kits and gear pieces hang their own payoff on the trigger. These are the ones in the current build:
| Source | What the trigger buys |
|---|---|
| Gratia, passive Silverium Blessing | On a Glacies Resonance Effect, all other characters on the team gain 12% ATK for 40s |
| Bentham, Psyche | After she triggers Zero Degrees, all characters gain 15% Glacies DMG for 40s |
| Rex and Bentham, Psyche | Fulmen and Glacies Resonance Effects each deal 2 additional instances of damage |
| Flattery and Honesty (Epiphany) | On a Resonance Effect, for every 1% Amplitude Coefficient the holder gained, all characters on the team gain 0.1% DMG for 40s, up to 10% |
| Vibrathrite (Catalyst) | Amplitude Multiplier up 450% for 10s on a trigger, 900% as Ultra Vibrathrite |
| Extracted Cobalt (Catalyst) | 450 Resonance of the matching attribute back on every trigger, 900 refined |
Two things follow from that table. The first is that Glacies is the attribute with the most trigger payoffs attached, between Gratia's team ATK buff and Bentham doing double duty as both an amplifier and a team buffer. The second is that a support who never deals the killing blow can still be the reason a team's damage doubles, since Gratia's 12% ATK and Bentham's 15% Glacies DMG both pay out to everyone else.
Attribute synergy: what sharing an attribute actually buys
Because there is no reaction chart, the reason to double up on a Reactor Attribute is not a combo. It is a specific set of Motive and Implement effects that only pay out to teammates who share the holder's attribute. There are six of them:
| Source | Effect on same-attribute teammates |
|---|---|
| The Resurrection Mystery (Motive) | At battle start, they deal +7% DMG, rising to +14% at refine 5 |
| City Grime Alliance (Implement set, 4-piece) | +8% DMG |
| Frustrations of Youth (Epiphany) | +50% CRIT DMG |
| The Metamorphosis (Epiphany) | +50% Amplitude Multiplier |
| The Price of Safe Passage (Epiphany) | +1% ATK for every 100 ATK the holder gains, up to 30% |
| The Hero's Shoulder (Epiphany) | That attribute's DMG up by the holder's attribute DMG x 25% plus 5%, up to 10% |
Read together, these are what make a mono-attribute team worth building. A mixed team fills two gauges slowly and collects none of the bonuses above. Note where each one sits: the Motive, the Implement set and the Epiphany occupy different slots, so a single character can carry all three at once. The four Epiphanies compete only with each other, since a character wears one Epiphany, and all four also raise the holder's own Ultimate Charge Efficiency by 25%, so the cost of running one is close to nothing.
Catalysts work on the same shared-attribute logic without the exclusivity. A Catalyst of a given attribute fits any character as long as somebody on the team carries a Reactor of that attribute, and Omni Catalysts fit anyone regardless. The Catalyst database has the full list and the Power budget that constrains it.
What none of this includes is an advantage triangle. There is no attribute that counters another, no weakness chart, and no shield you break by matching a type. Enemy resistance appears only as one-directional debuffs on a handful of kits, such as Grimm reducing enemies' Fulmen RES or Gucia ignoring 10% of Alba RES.
FAQ
What is the Resonance system in Silver Palace?
Resonance is the payoff layer that replaces elemental reactions. Every Reactor Attribute your team fields gets its own meter on the enemy you are hitting, filled by dealing damage of that attribute. When a meter fills, that attribute’s named Resonance Effect fires on the target.
Where is the Resonance meter on screen?
On the enemy nameplate in the upper part of the HUD, directly below the health and stagger bars. Each attribute your team brings gets a small icon there with a circular gauge around it, and the gauge fills clockwise as you deal that attribute’s damage.
What are all seven Resonance Effects?
Extreme Heat (Ignis), Zero Degrees (Glacies), Superconductor (Fulmen), Dark Star (Gravitas), Decay (Radiatio), Disintegration (Alba), and Purification (Ferrugo). One effect per Reactor Attribute.
Why does Disintegration say Ferrugo in game?
The in-game description text swaps the two element names. The attribute icon printed on the Disintegration row is Alba’s icon, and the icon on the Purification row is Ferrugo’s, so Disintegration belongs to Alba and Purification belongs to Ferrugo.
Is there an attribute weakness chart in Silver Palace?
No. There is no advantage triangle, no counter chart and no shield you break by matching an attribute. The reason to share a Reactor Attribute across a team is that one Motive and five Implement set bonuses pay out only to teammates who share the holder’s attribute.
What do you get for running a mono-attribute team?
The Resurrection Mystery Motive grants same-attribute teammates up to 14% DMG at battle start, the City Grime Alliance Implement set adds 8% DMG, and four Epiphanies add 50% CRIT DMG, 50% Amplitude Multiplier, up to 30% ATK or up to 10% attribute DMG to teammates sharing the holder’s attribute. A mixed team collects none of them and fills two Resonance gauges slowly instead of one quickly.
Can you increase Resonance without attacking?
Yes. Resonance is a quantity kits and gear can add directly: Rex’s Evil Eradicator Psyche adds 100 Fulmen Resonance when he casts Nunchucks Law, the Killing That Which You Love Epiphany deals 100 Glacies Resonance on consuming a Pomegranate Kiss stack, and Extracted Cobalt returns 450 Resonance on every Resonance Effect trigger.
Does Resonance carry over between enemies?
No. Resonance is tracked per target, so the meter you built on one enemy does not transfer to the next one. It is also tracked per attribute, which means splitting damage between two Reactor Attributes fills two gauges slowly instead of one gauge quickly.